|
|
|
Ages: 7-12
General Theme: Food Chains
Setting: Classroom
Materials: Mammals, Plants, Birds, Bugs Field Guides
Food Chain Examples worksheets
Food Chain Research worksheets
3x5 cards or pre-cut similar
Yarn and scissors
Markers, crayons, pencils
Objectives: To demonstrate understanding of real-world food chains, and to create a visual representation of the complex flow of energy through ecosystems.
Day 1: Food Chain Basics
1. Background Information: All living things need energy to live. Plants need energy to grow, to produce seeds, to produce fruits. Animals need energy to move, to have babies, to maintain their body temperature, and more. All of these living organisms get energy from the food chain. The food chain is simply the movement of energy through an ecosystem and it looks like this:
2. Draw/Write Basic Food Chain: Sun--->Plant--->Herbivore--->Carnivore--->Decomposer
Explain that the arrow shows the direction the energy flows. It starts with the sun, moves into the plants (through photosynthesis), then into the herbivores as they eat the plants, etc…
3. Draw/Write Example Food Chain: Sun--->Grass--->Deer--->Coyote--->worms (after the coyote dies)
4. Allow students time to create their own sample food chains using the worksheet.
Day 2: Research Plants and Animals
1. Introduction: To create real-life food chains, we need to know what different animals eat. Use the Field Guides to identify the plants, and animals in the Rocky Mountain ecosystems, and the foods eaten by various animals including mammals, birds and insects.
2. Demonstrate how to identify the food preferences of mammals, birds and insects
1. Mammals/Birds/Insects: Look at the symbols to identify Herbivores, Carnivores and Omniovres
2. Mammals: Look on the right-hand page: Habitat, then under Food to see each mammal’s diet.
3. Birds/Insects: Look on the left-hand page under Habitat, then under Food to see each animal’s diet.
3. Ask students to demonstrate their understanding: Ask them to find a few examples (Is a Deer Mouse an herbivore, omnivore or carnivore? What foods do they eat?, etc…)
4. Once students have demonstrated how to use the book as a resource, have them complete the worksheet.
Day 3: Visual Demonstration Contest
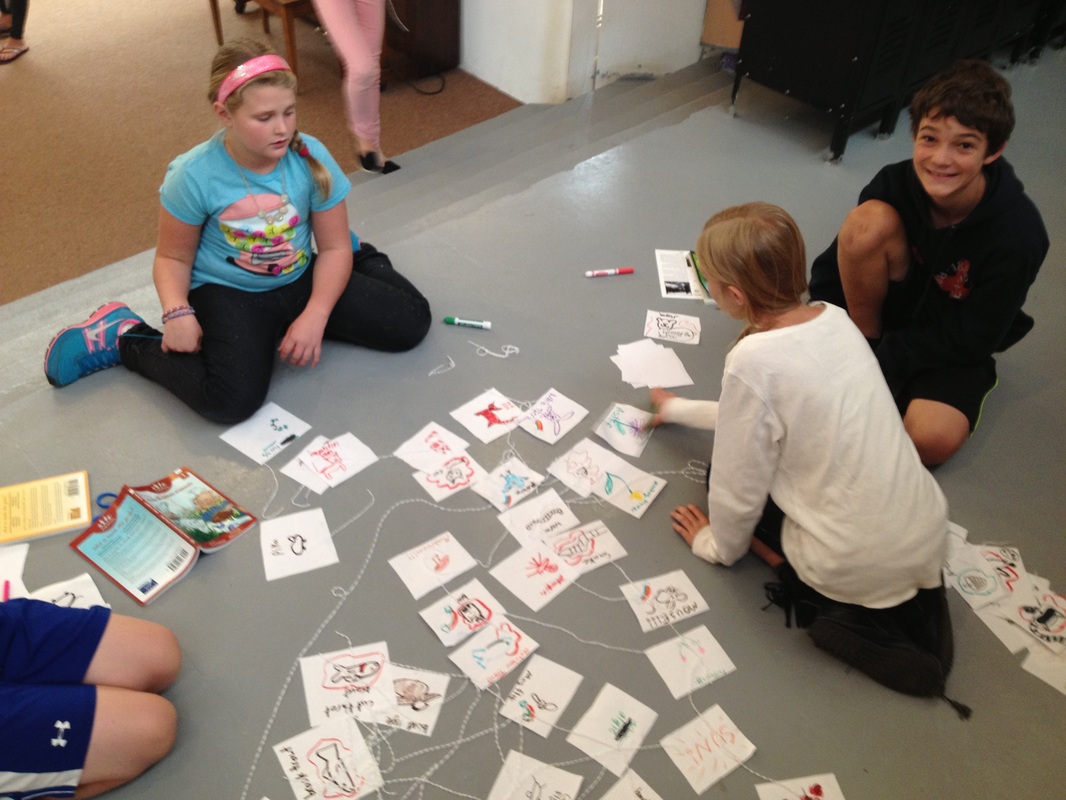
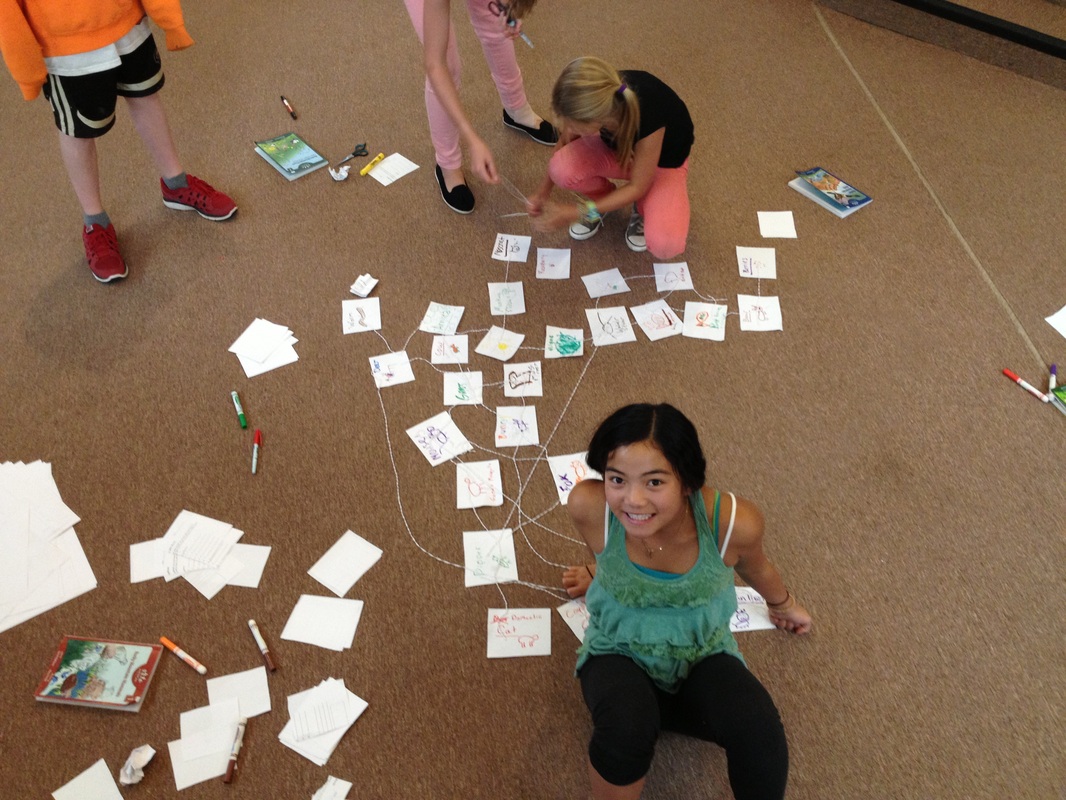
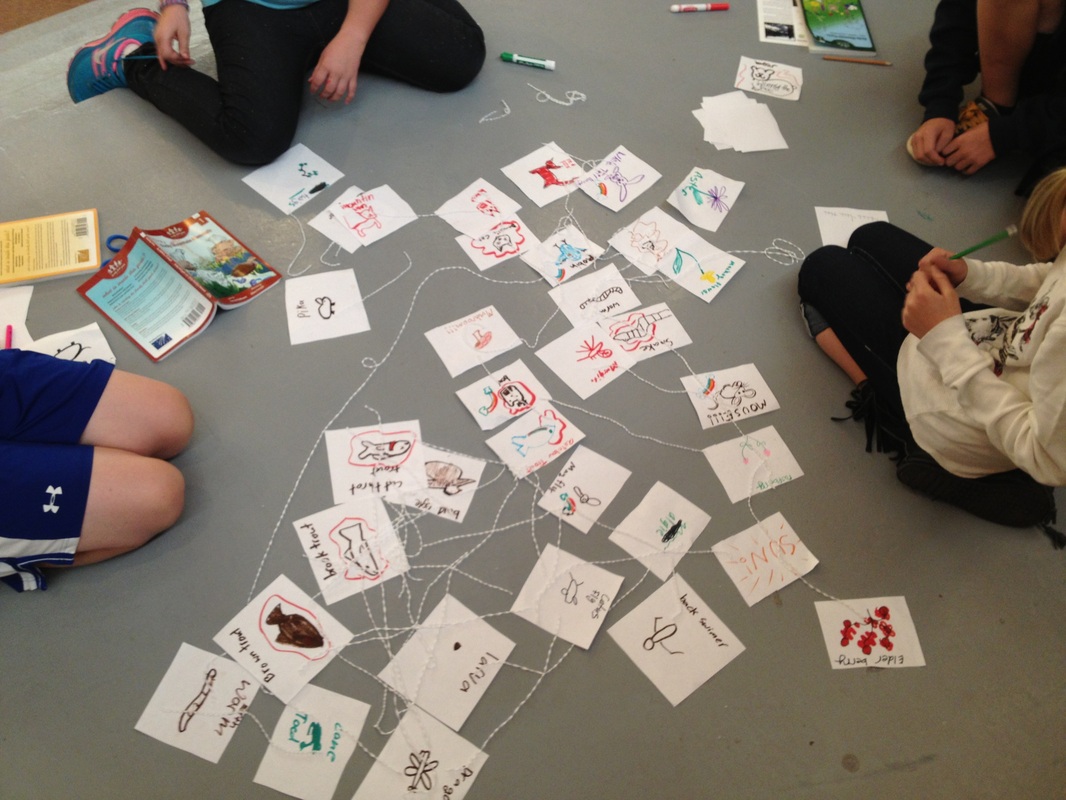
Objective: Groups of students will work together to create a food web by connecting pictures of plants or animals with string; each string connects animals or plants that each each other.
1. Divide students into groups of 3-5 students in each group.
2. Provide each group with a stack of 3x5 cards, or ask them to cut out similar sized rectangles of paper, and a bunch of 12” long strands of yarn.
3. Explain the following activity: Students will draw a picture of the sun on a card, and place that card on the ground. Next, write the name or draw a picture of a plant, and place a piece of yarn so it touches the sun and the plant, representing that the sun’s energy moves to the plant. Next draw an animal that eats that plant on a card (or several animals that eat that plant on several cards) and lay down a piece of yarn connecting the animal to the plant. Next, write/draw an animal that eats that animal, and lay down a string. Etc… Continue for 20-30 minutes adding as many plants, mammals, birds and insects, and connecting them with as many strings as possible.
4. Guidelines:
1. Use the books and the Food Chain Research worksheets (from day 2) as references to be sure that the proper animals are connected with the accurate foods.
2. Remember, a single animal may have many strings attached. For example a deer mouse is eaten by bobcats, coyotes, mountain lions, pine martens, etc…, so there may be 4 strings or more connecting the deer mouse to all of its predators.
5. Show pictures of the example Food Web from the website as an example.
6. Allow the rest of the class period to work (20 minutes is a good minimum amount of time for this group project).
Day 4: Questions
General Theme: Food Chains
Setting: Classroom
Materials: Mammals, Plants, Birds, Bugs Field Guides
Food Chain Examples worksheets
Food Chain Research worksheets
3x5 cards or pre-cut similar
Yarn and scissors
Markers, crayons, pencils
Objectives: To demonstrate understanding of real-world food chains, and to create a visual representation of the complex flow of energy through ecosystems.
Day 1: Food Chain Basics
1. Background Information: All living things need energy to live. Plants need energy to grow, to produce seeds, to produce fruits. Animals need energy to move, to have babies, to maintain their body temperature, and more. All of these living organisms get energy from the food chain. The food chain is simply the movement of energy through an ecosystem and it looks like this:
2. Draw/Write Basic Food Chain: Sun--->Plant--->Herbivore--->Carnivore--->Decomposer
Explain that the arrow shows the direction the energy flows. It starts with the sun, moves into the plants (through photosynthesis), then into the herbivores as they eat the plants, etc…
3. Draw/Write Example Food Chain: Sun--->Grass--->Deer--->Coyote--->worms (after the coyote dies)
4. Allow students time to create their own sample food chains using the worksheet.
Day 2: Research Plants and Animals
1. Introduction: To create real-life food chains, we need to know what different animals eat. Use the Field Guides to identify the plants, and animals in the Rocky Mountain ecosystems, and the foods eaten by various animals including mammals, birds and insects.
2. Demonstrate how to identify the food preferences of mammals, birds and insects
1. Mammals/Birds/Insects: Look at the symbols to identify Herbivores, Carnivores and Omniovres
2. Mammals: Look on the right-hand page: Habitat, then under Food to see each mammal’s diet.
3. Birds/Insects: Look on the left-hand page under Habitat, then under Food to see each animal’s diet.
3. Ask students to demonstrate their understanding: Ask them to find a few examples (Is a Deer Mouse an herbivore, omnivore or carnivore? What foods do they eat?, etc…)
4. Once students have demonstrated how to use the book as a resource, have them complete the worksheet.
Day 3: Visual Demonstration Contest
Objective: Groups of students will work together to create a food web by connecting pictures of plants or animals with string; each string connects animals or plants that each each other.
1. Divide students into groups of 3-5 students in each group.
2. Provide each group with a stack of 3x5 cards, or ask them to cut out similar sized rectangles of paper, and a bunch of 12” long strands of yarn.
3. Explain the following activity: Students will draw a picture of the sun on a card, and place that card on the ground. Next, write the name or draw a picture of a plant, and place a piece of yarn so it touches the sun and the plant, representing that the sun’s energy moves to the plant. Next draw an animal that eats that plant on a card (or several animals that eat that plant on several cards) and lay down a piece of yarn connecting the animal to the plant. Next, write/draw an animal that eats that animal, and lay down a string. Etc… Continue for 20-30 minutes adding as many plants, mammals, birds and insects, and connecting them with as many strings as possible.
4. Guidelines:
1. Use the books and the Food Chain Research worksheets (from day 2) as references to be sure that the proper animals are connected with the accurate foods.
2. Remember, a single animal may have many strings attached. For example a deer mouse is eaten by bobcats, coyotes, mountain lions, pine martens, etc…, so there may be 4 strings or more connecting the deer mouse to all of its predators.
5. Show pictures of the example Food Web from the website as an example.
6. Allow the rest of the class period to work (20 minutes is a good minimum amount of time for this group project).
Day 4: Questions
